

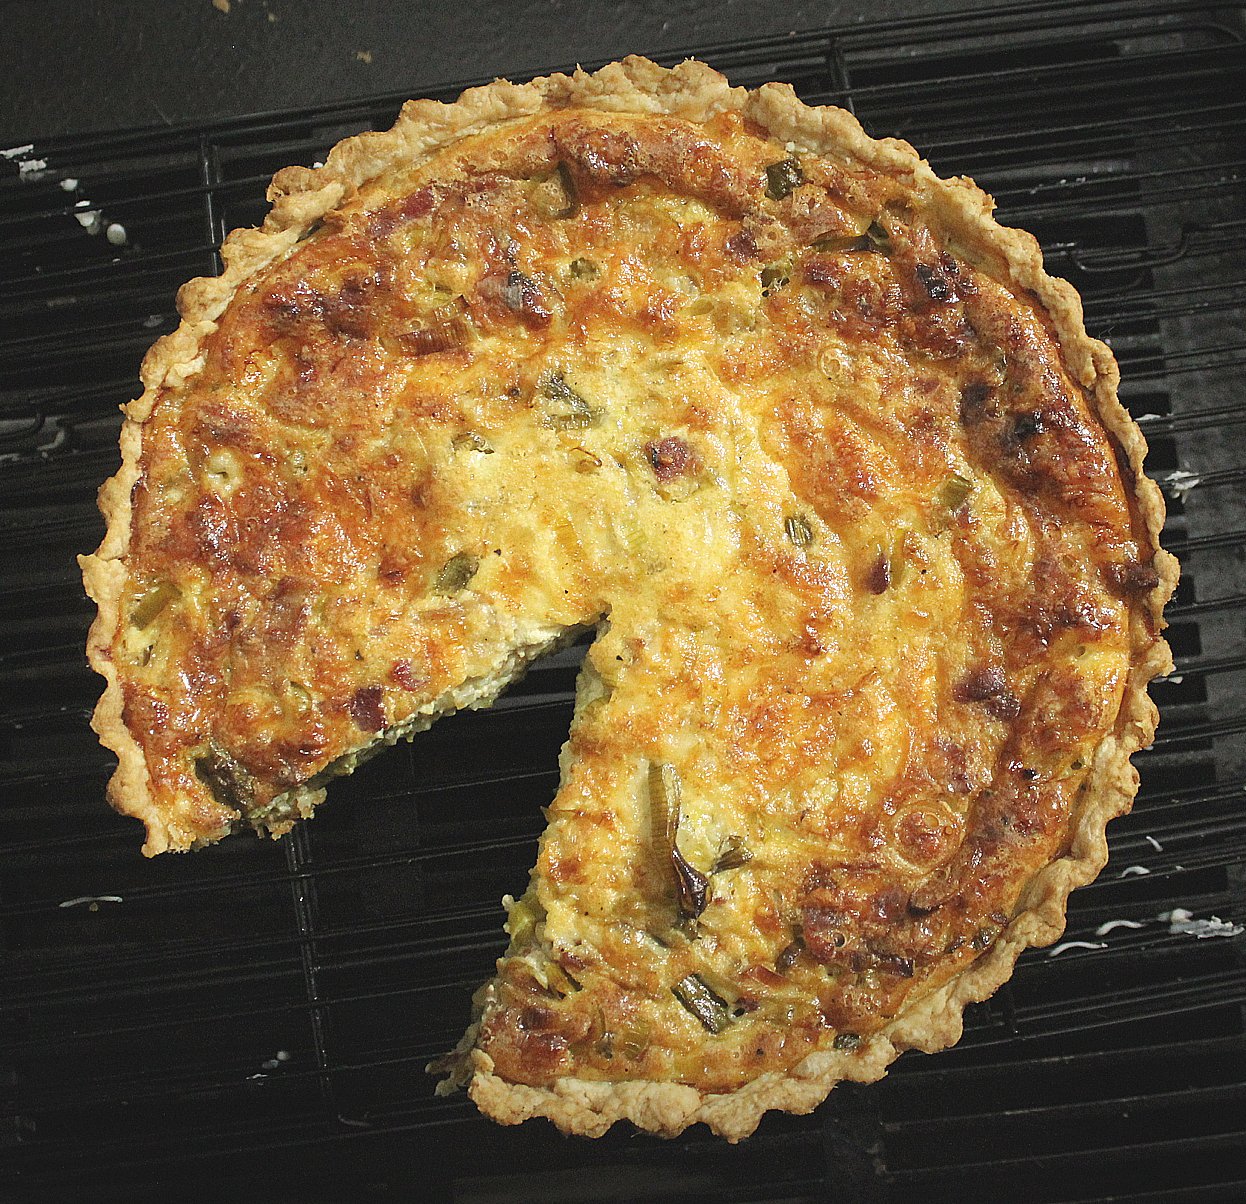
Simple leek and asparagus quiche is the best brunch dish ever! It's an easy bacon and leek quiche recipe that's full of all the best flavors.
*This post contains affiliate links — as an Amazon Associate I earn from qualifying purchases. Please see my disclosure for details*.
And if you like this bacon and leek quiche recipe, try some my other brunch favorites: my Cinnamon Roll Donuts, my Pumpkin Spice Espresso Martini, or my collection of Smoothie Recipes Without Yogurt!
Bacon and Leek Quiche Recipe
I'm so excited to share this bacon, leek, and asparagus quiche! It's by far my favorite quiche recipe, and it's a straightforward, delicious recipe that always comes out amazing!
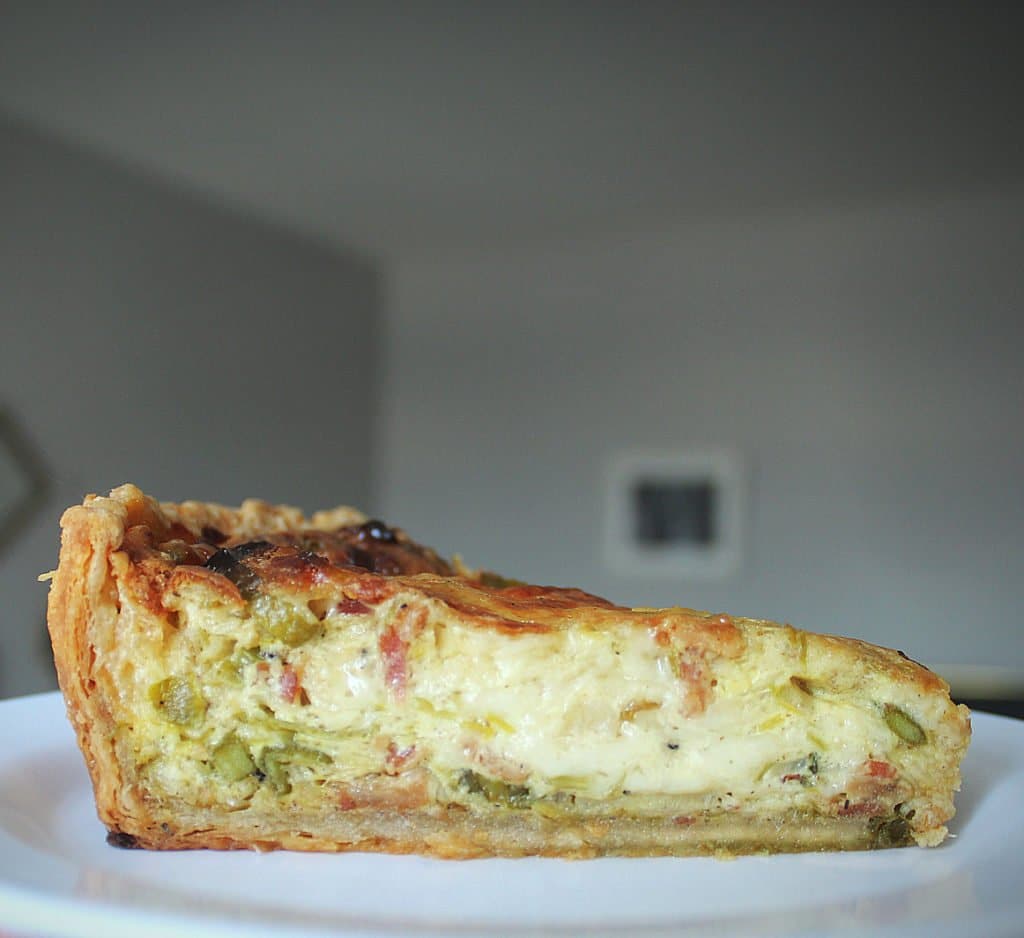
This quiche has sautéed leek, shallots, and asparagus, as well as crisp bacon and nutty gruyère cheese, all baked up with an egg custard filling in an all-butter pie crust. This is the perfect recipe for a brunch for a crowd, or a special occasion dinner, or just because you're in the mood for quiche!
Jump to:
Deep Dish Quiche Pan
In the past, I've made quiches in a regular pie pan, or in a standard shallow tart pan. But it wasn't until I got a deep dish quiche pan with a removable bottom like this one (affiliate link) that my quiches started to be next level!
First of all, the fluted edges of the pan eliminate the need to crimp your pie crust, and you always end up with a beautiful result! Second, the removable bottom and nonstick material makes it incredibly easy to remove the entire quiche from the pan to allow it to cool before slicing. You can also use the removable bottom to transport the quiche from the pan to a serving plate or cooling rack. It really changes everything compared to a standard pie pan!
And as a bonus, you can use a deep dish quiche pan (also known as a deep tart pan, or just as a quiche pan -- either way, just make sure it's nonstick and has a removable bottom) for lots of other dishes! I've used mine to make regular dessert pies, chicken pot pies, and even coffee cakes. You'll be surprised how useful the removable bottom is.
Step by Step!
OK let's get into the recipe! I will admit, this leek breakfast quiche has more steps than your typical breakfast recipe, but it's definitely worth it! And there are a few places where you can save time with shortcuts. Plus, most of it can be prepared ahead of time!
Step 1: Pie Crust

I made this quiche using my all-butter stand mixer pie crust recipe. It's so easy and always comes out flaky and delicious! But one shortcut you can use to make this recipe a little easier is to use a store-bought pie crust. I like the ones that roll out (rather than the frozen ones that come in a disposable pan), so that it can still have a homemade vibe. Whichever you choose, have your pie crust in your quiche pan ready to go before you start on the filling.
Step 2: Preheat oven (and try this hot baking sheet trick)!
There is some debate about whether to blind bake a quiche crust or not. I am usually a big fan of blind baking, but to save time, I would recommend this tip from The Kitchn: Preheat your oven with a large baking sheet inside, and when you put your quiche in the oven, place it directly on that hot baking sheet. The heat directly on the bottom of the quiche will counteract the moisture from the custard filling, and you end up with nicely browned bottom crust!
Step 3: Bacon

Everyone's favorite! In this quiche, you'll use thick-cut bacon, about 5 slices. You can fry it up on the stove (my preference, because I then cook the veggies in a little bacon grease), or cook it in the oven, or however you normally cook bacon.
Step 4: Veggies for filling
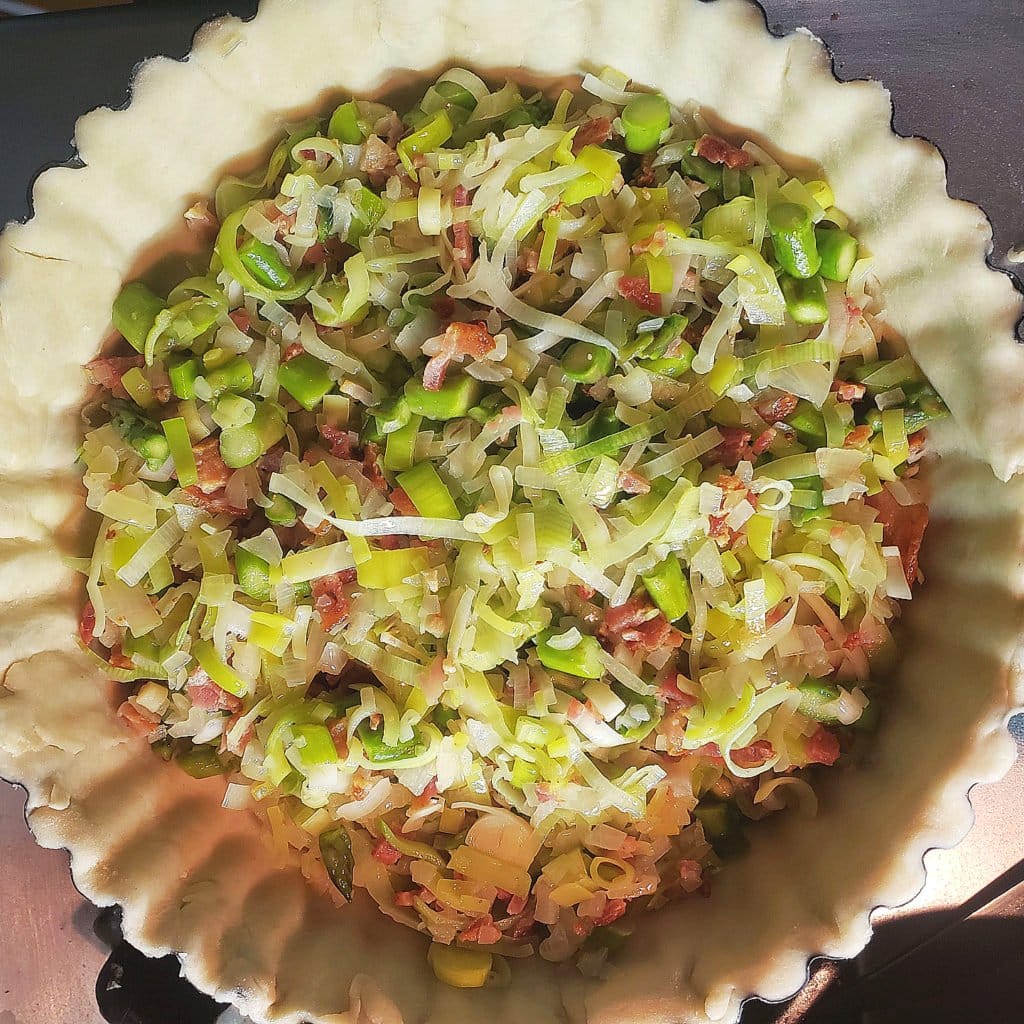
While your bacon is cooking, you'll want to chop your veggies for the filling. This is the most time-consuming part of the recipe, but the veggies in this quiche are really the stars of the show. The bacon and cheese add lots of flavor, but the leeks, asparagus, and shallots really take it to the next level. Slice your leeks nice and thin, chop your shallots small, and cut the asparagus in about ½ inch pieces.
Then, once your bacon is out of the pan, you'll sauté the veggies for a few minutes, combine them with your chopped bacon, and drain the mixture.

Step 5: Custard mixture

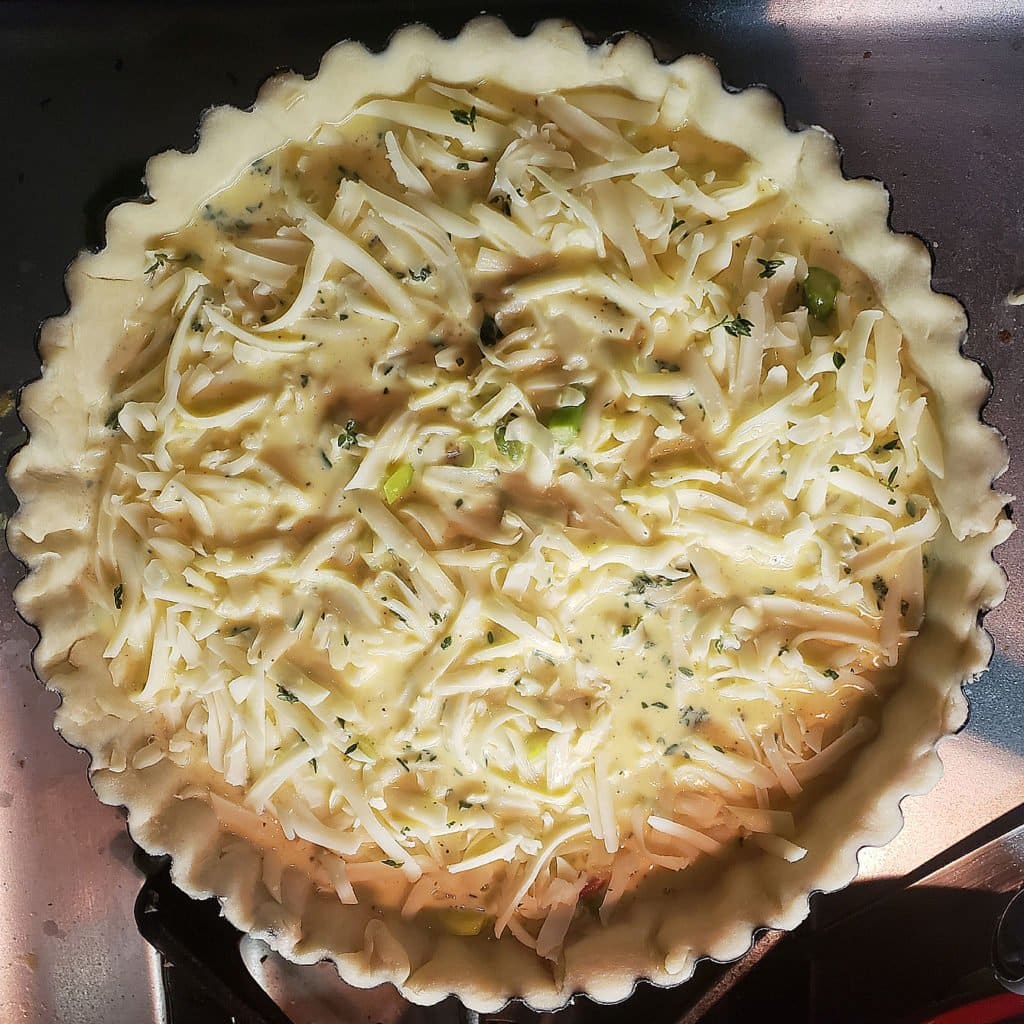
Step 6: Cheese
Now you'll just need to shred your cheese. Gruyère is my go-to cheese for this quiche. It's flavorful and nutty, but melts very well and complements the bacon and veggies perfectly. But if you prefer, you could substitute another semi-hard cheese like gouda, cheddar, or Monterey Jack. The best thing about quiche is how easy it is to customize to your preference! Let me know below if you do decide to swap out any of the cheeses -- I'd love to know how it works out! And if you like cheesy recipes, you'll love my Cottage Cheese Alfredo!
Step 7: Assembly
Finally, you'll need to put all your elements together. Start with gently pressing the pie crust into your quiche pan and removing the overhang (I like to use a rolling pin for this). Then spoon your bacon and vegetable mixture into the crust, followed by the cheese and chopped thyme. Finally, pour the custard mixture over everything and stir gently to make sure the filling is distributed well throughout all the ingredients.


Step 8: Bake!
Finally, you're ready to pop your quiche in the oven! That wasn't so bad, was it? Tent the top of the quiche loosely with foil and place the quiche on the hot baking sheet that was preheating in your oven. Let it bake for 50 minutes, and then remove the foil. Bake for an additional 15-25 minutes, and it's ready!
Cooling, Slicing and Serving
If you haven't used a quiche pan with a removable bottom before, you'll be blown away at how easy it is to take the whole quiche out of the pan at once. Just Set the pan on top of a small bowl, a can, an empty jar, or anything that's not as wide as the bottom of the pan, and gently pull down on the sides of the pan. The sides of the pan should separate and fall down while the bottom of the pan (and the quiche on top of it) stays balanced on top!
From there, you can either remove the bottom from underneath your quiche, but I like to leave it there for cooling and serving to make it easier to move the quiche if I need to. Be sure to cool your quiche for at least 30 minutes before serving. Serve your quiche slightly warm or at room temperature. Enjoy!
And for another yummy quiche recipe, try this quiche lorraine!
📖 Recipe
Equipment you may need
- nonstick sauté pan
- cheese grater
Ingredients
- 1 pie crust - store-bought or homemade (see note)
- 6 oz. thick-cut bacon - about 5 slices
- 2 cups leeks - thinly sliced
- 1 cup shallots - diced
- 1 cup asparagus - chopped
- 4 large eggs - beaten
- 1 cup heavy cream
- ½ cup milk
- ¼ tsp. ground nutmeg
- ½ tsp. salt
- ¼ tsp. pepper
- 6 oz. Gruyere cheese - shredded
- 1 teaspoon fresh thyme
Instructions
- Line deep dish tart pan with pie crust and remove overhang.
- Preheat oven to 400° F. place a large baking sheet on the oven rack while the oven heats up. (See note)
- In a large nonstick pan, cook then dice bacon, reserving 2 tablespoon bacon drippings. Remove and cover bacon pieces.
- Add leeks, shallots and asparagus to pan with reserved drippings. Cook over medium heat until leeks are soft and asparagus are slightly tender, about 3-5 minutes. Place in colander to drain and cool slightly.
- Stir bacon into vegetable mixture.
- Spoon drained bacon/vegetable mixture into pie crust. Top with cheese, then sprinkle thyme evenly over cheese.
- Pour on egg mixture, being sure to leave about ½ inch gap from the egg mixture to the top of the crust. Use a spatula to ensure the egg mixture is fully incorporated throughout quiche.
- Tent lightly with foil and place in oven on preheated baking sheet. Bake for 65-75 minutes or until deep golden brown and a toothpick inserted in center comes out clean. Remove foil for last 20 minutes of baking.
- Cool for at least 30-45 minutes before slicing. Serve warm or at room temperature.
Notes
- Store prepared quiche filling in the fridge overnight with blind-baked crust wrapped on countertop, and assemble and bake the next morning.
- Store baked, cooled quiche in the fridge, wrapped well, for up to three days. Reheat in 350-degree oven for about 20 minutes. (My favorite option!)
- Freeze unbaked, assembled quiche until solid, and then wrap it in plastic wrap and foil to freeze for up to one month. Bake from frozen as directed above, adding 10-20 minutes to the cook time.
- Freeze baked, cooled quiche in plastic and foil for up to 3 months. Reheat at 350 degrees F for about 30 min
PIN this breakfast quiche recipe for later!


Last Updated on March 22, 2025 by Chenée Lewis


Jazz says
This is perfect for weekend brunch since we've been staying home lately!
Chenée Today says
Thanks! It's so perfect for brunch!
Christy Hoover says
If you say quiche, I am there. This recipe is so good.
Chenée Today says
So glad you liked it!!
Tamara says
The step-by-step instructions are the best! This quiche is easy, and absolutely perfect for our brunch menu!
Chenée Today says
So glad you like it!! Enjoy!
Katrina Adams says
I love quiche!! Thank you giving me a new way to make it!!
Chenée Today says
Thank you!! I love it too!
Desirée says
This quiche looks amaaaazing! And that crust?! WOW!
Chenée Today says
Thanks!! The crust is my favorite part 🙂
Marta says
I'm always looking for new quiche recipes to serve my family. I'm big on making quiche for dinner and serving it with a garden salad.
Chenée Today says
Me too! I like quiche anytime -- except dessert I guess lol.